Acquiring Agent Desktop Native Logs
To acquire the Agent Desktop Native (ADN) logs, complete the following steps:
- Go to the Windows Start Menu.
- In the search field, type %appdata%. You should see a folder named Roaming within the search results.
- Open the Roaming folder and then open the Agent Desktop Native folder.
- Enable ADN logging on the agent's workstation. If you have already enabled ADN logging on this workstation in the past, skip to Step 5.
- Within the Agent Desktop Native folder, locate the config.json file.
- Open the config.json file and replace the line {"clientCode":"XXX"} with {"clientCode":"XXX","loggerFileLevel":"verbose"}. Note: XXX is the client code and is different for each client.
- Restart ADN.
- Once ADN logging is enabled, logs will write to: Roaming > Agent Desktop Native > log.log.
- Copy the log.log file and send it to LiveVox for review
Locating .NET Logs
For Agent Registration App agents, complete the following steps to locate the .NET logs on an agent's computer:
- Go to the Windows Start Menu.
- In the search field, enter %appdata%. As a result, you should see a folder named Roaming.
- Open the Roaming folder and then open the livevox folder.
- Locate the agentregistration.log file.
- Copy the agentregistration.log file and send it to LiveVox for review.
Acquiring F12 Logs on Agent Desktop Native
To acquire F12 logs on ADN, complete the following steps:
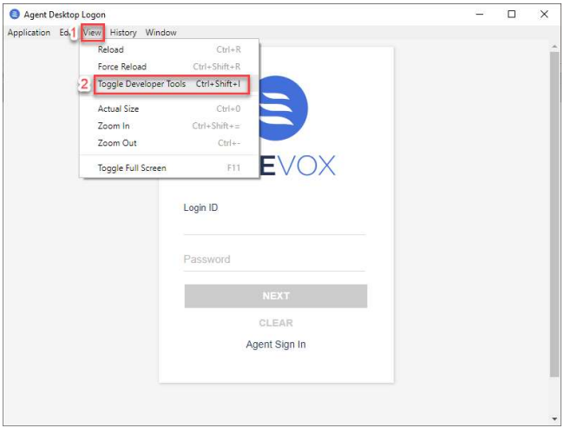
- After launching the ADN application, click the View drop-down list and then select the Toggle Developer Tools option.

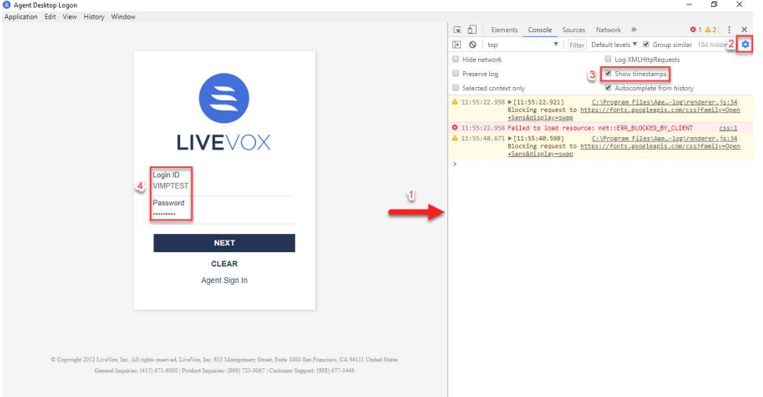
- From the Developer Tools window, click Console Settings and then click in the Show timestamps box.

- Ask the agent to log in.