
A campaign is a focused attempt to contact customers based on factors such as dialing strategies, customer service goals, or regions. Campaign files contain phone numbers and customer information for use on the LiveVox dialing systems. This topic describes how to upload a campaign file from the Campaign window.
To upload a campaign file:
- From the LiveVox Portal, navigate to Configure > Campaigns > Campaigns.
- Click the Upload button in the lower-right corner of the Campaigns window. The Upload Campaign window appears.
- In the Upload Campaign window, select the Basic tab to set service and campaign-level attributes.
Basic Settings
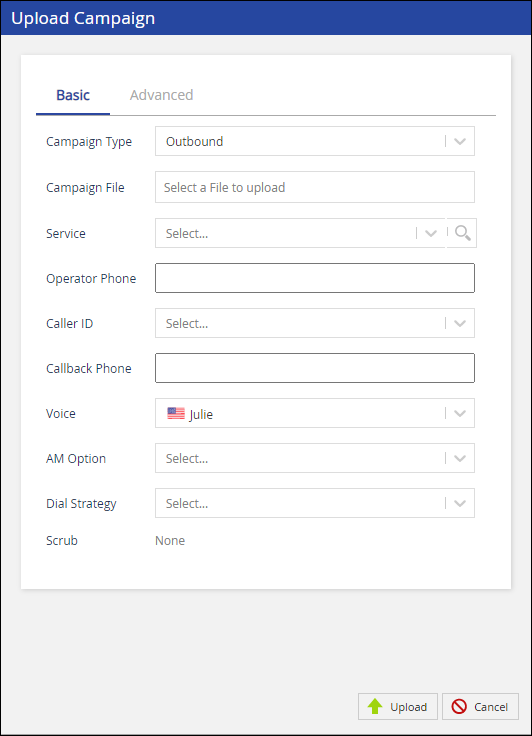
DeleteField Action Campaign Type Select the campaign type (Outbound, SMS, HCI, 10DMT, Messaging, and HTI) from the drop-down menu. Campaign SubType This field appears if the value in the Campaign Type field is Messaging. Select the type of messaging (for example, WhatsApp).
Campaign File - Click either in this field or on the green arrow icon to navigate to the local directory that contains the file to be uploaded.
- Select the file you want to upload (one at a time) by highlighting the file, and clicking Open, or by double-clicking the file name.
To load multiple files using SFTP for automatic processing, contact the LiveVox Customer Care Team.Service Select the service on which you want the campaign to run. You can also search for a service by its name, call center, type, and preview mode by clicking the magnifying glass icon. Operator Phone This field appears if the value in the Campaign Type field is 10DMT, HCI, HTI, or Outbound.
Enter the number that you want the LiveVox platform to first dial for tethering extension-based agents into the system.Caller ID This field appears if the value in the Campaign Type field is 10DMT, HCI, HTI, or Outbound. Select the number from which you want the customers to be called.
The options in the Caller ID field are determined by the value in the Caller ID Source ID field on the Settings tab of the selected service.Callback Phone This field appears if the value in the Campaign Type field is 10DMT, HCI, HTI, or Outbound. Enter the number that you want your customers to dial if they want to contact you—this is the number that you want to leave on their answering machines.
The type of the Callback Phone field (that is, disabled or drop-down list box) is determined by the value in the Callback Phone Source ID field on the Settings tab of the selected service.
To add or modify the pre-defined caller ID phone numbers displayed by the service, contact the LiveVox Customer Care Team.Voice This field appears if the value in the Campaign Type field is 10DMT, HCI, HTI, or Outbound. Select the voice that you want to be used in the calls.The list of possible voice talents includes: - Bob: American Male
- Claudine: French Canadian Female
- Gisele: Portuguese Female
- Gruff F: American Female
- Gruff M: American Male
- Juanita: Spanish Female
- Julie: American Female
- Kate: British Female
- Lee: American Male
- Scarlet: South American Female
AM Option This field appears if the value in the Campaign Type field is 10DMT, HCI, HTI, or Outbound. Select the answering machine (AM) option that you want to be used for the calls.
The default value in the AM Option field is the same as that in the AM Option field on the Settings tab of the selected service. Depending on the configuration, this field contains the following options:- Don't Leave Messages: If an answering machine is detected, does not leave a message and disconnects the call.
- Leave Messages: Detects answering machines and leaves a message.
- Transfer all Connections: Does not detect answering machines and transfers all connections to agents.
Dial Strategy Select the strategy that you want to be used for contacting the phone numbers. From This field appears if the value in the Campaign Type field is Email. Select the name of the email address from which you want the emails to be sent to your customers.
Email Message This field appears if the value in the Campaign Type field is Email. Select the template that you want to be used in the email message.
Message This field appears if the value in the Campaign Type field is Messaging or SMS. Select the template that you want to use in the SMS or WhatsApp message.
Scrub This is a read-only setting that denotes the wireless segmentation option for the selected service. This setting is configured in the Settings tab of the Client editor. The field contains one of the following values: - None: Does not scrub (remove) any phone number.
- Wireless: Scrubs all wireless numbers so that all landline numbers are contacted.
- Landline: Scrubs all landline numbers so that all wireless numbers are contacted.
- Segmented Wireless: Enables you to use different contact strategies based on the position of a phone number to contact both landline numbers and wireless numbers from the same campaign. All wireless numbers from positions 1 through 15 are scrubbed and start from position 16.
- Select the Advanced tab to enable segmentation, scheduling, and append settings.
Advanced Settings
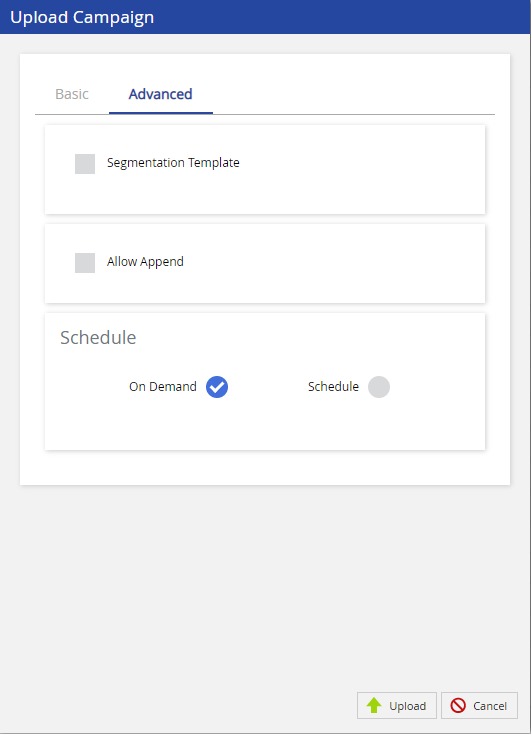
DeleteField Action Segmentation Template Select this checkbox if you want the campaign to be divided into smaller campaigns (sub-campaigns). A field appears for you to select a segmentation template. Allow Append Select the check box to allow this campaign to be added/appended to an active campaign using the Campaign API. On Demand Select this option to manually control the campaign's dialing. Schedule To schedule a campaign's dialing, select the radial button next to Schedule.
When you select the checkbox, by default, the campaign is scheduled to start running immediately after it is uploaded (as indicated by the selected ASAP checkbox) and stop running when one of the following criteria is met (as indicated by the selected End of Day checkbox):- The contact window (based on compliance policies) ends.
- When all the phone numbers in the campaign have been contacted.
- When the campaign is manually stopped.
- Click the Upload button in the Upload Campaign window to complete the process.
A message appears in the portal stating that the campaign was successfully created.
The shelf life for campaign files is 14 days. Shelf life defines the number of days the campaigns are displayed on the LiveVox Portal Manager screen. This is a default setting.