Importing Contacts into Contact Manager
Table of Contents
You can create multiple contact records at once on the LiveVox Portal (LVP) using the Import feature of Contact Manager. This feature enables you to import contact records from a file on your computer into Contact Manager on the LiveVox Portal.
This article describes how to import contacts from a comma-separated values (CSV) file into Contact Manager.
Before You Begin
Before you import the contact records from a file into Contact Manager on the SmartReach portal, you must create an appropriate input filter. An input filter processes and formats the data from your file so that the data is recognized by SmartReach.
To create an input filter for importing contacts:
LV 19 and Fall 23
- Log in to LVP.
- On the Configure tab, click Input / Output > Input Filter.
The Input window appears. - Click Add Filter.
The Add Filter window appears. - Specify values in the following fields:
- Target(s): Select Contact.
-
Name: Enter a name to identify the input filter.
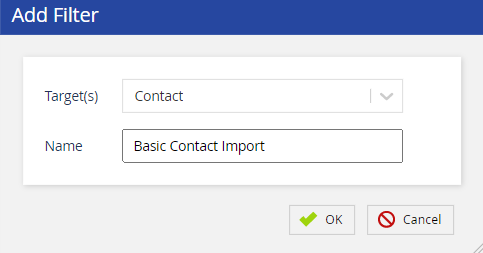
- Click OK.
The Input window appears.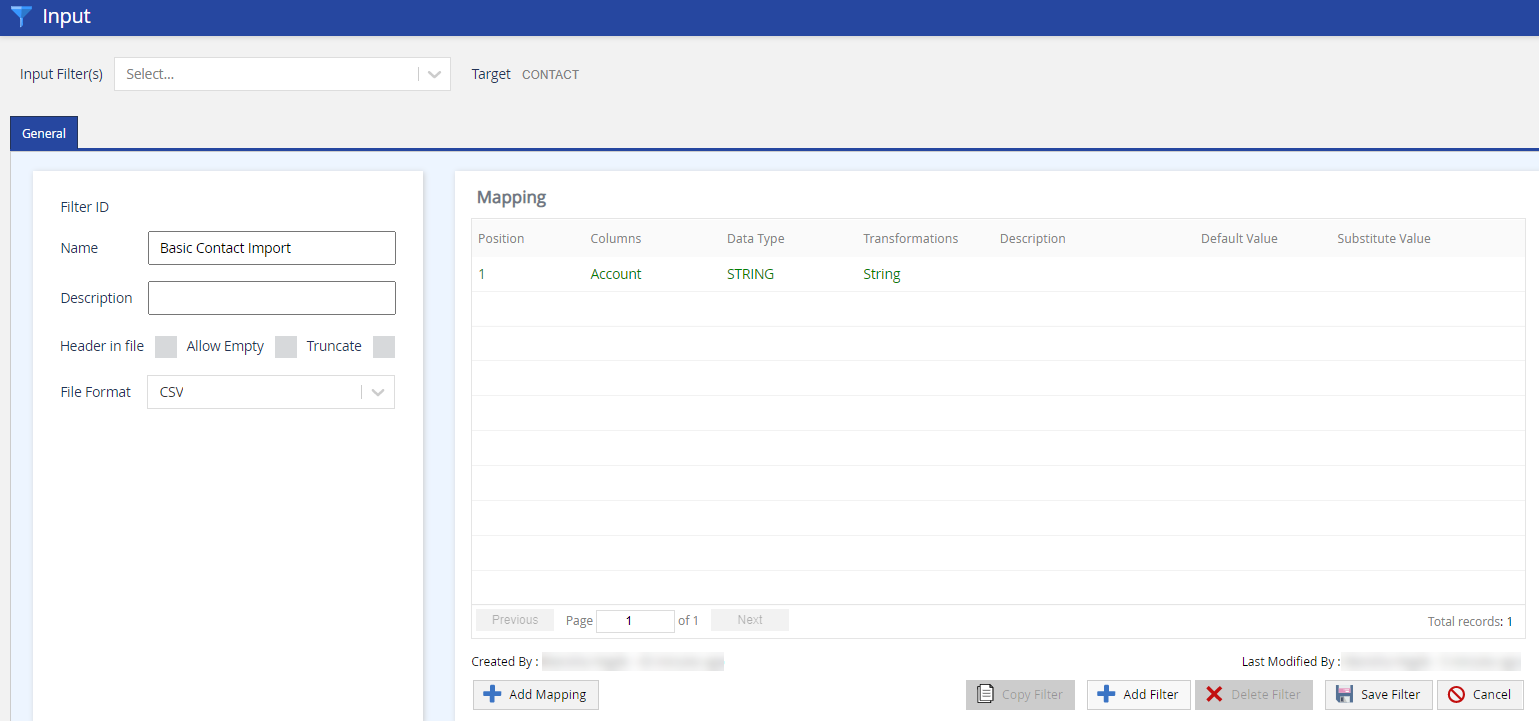
- Specify values in the following fields:
- Description (Optional): Enter a description of the input filter.
- Header in file: If your file contains a header row, select this checkbox so that the header row is ignored when the file is imported to LVP.
- Allow Empty: To allow null values in the file to be imported to LVP, select this checkbox.
- Truncate: To allow the values in the fields to be shortened if a value exceeds the predefined size limit of a field, select this checkbox.
-
File Format: Select CSV.
- Click Add Mapping.
The Add Mapping window appears.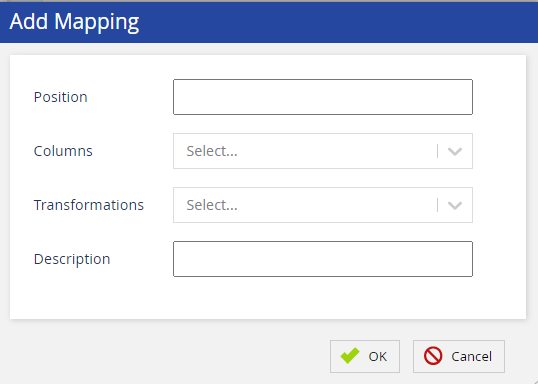
- Specify values in the following fields:
-
Columns: Select the LVP field that represents a field in the file.
Example
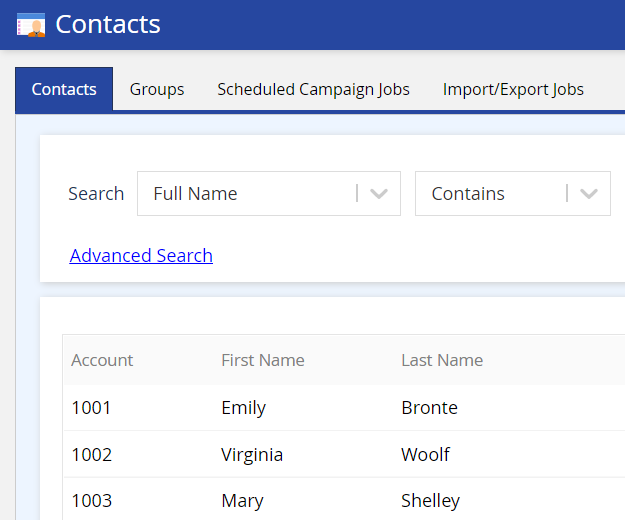
Suppose that your file contains three records presented as follows.
Delete
To add a mapping for the first name field, in the Columns field, select First Name. Similarly, to add a mapping for the last name field, in the Columns field, select Last Name. -
Position: Enter the position of the field in the file.
Example
Suppose that your file contains three records presented as follows:
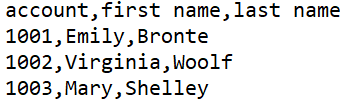
In the Position field:- For the Account mapping, enter 1.
- For the First Name mapping, enter 2.
- For the Last Name mapping, enter 3.
- Transformations: Select the data type of the field.
- Description (Optional): Enter a description of the field.
- Default Value: If the field is always required in the business workflow, specify the property (for example, Enabled or Disabled) or value that must be displayed in that field if it does not contain a property or value in the file.
-
Columns: Select the LVP field that represents a field in the file.
- Click OK.
- Repeat Steps 7 through 9 for each field in your file.
- Click Save Filter.
The input filter is created. You can now import contacts from your file into Contact Manager.
Fall 24
- Log in to SmartReach.
- On the Config tab, click Input / Output > Input.
The Input window appears. - Click the + Add button.
The Add Filter window appears. - Specify values in the following fields:
- Target(s): Select Contact.
-
Name: Enter a name to identify the input filter.

- Click OK.
The Input window appears.
- Specify values in the following fields:
- Description (Optional): Enter a description of the input filter.
- Header in file: If your file contains a header row, select this checkbox so that the header row is ignored when the file is imported to SmartReach.
- Allow Empty: To allow null values in the file to be imported to SmartReach, select this checkbox.
- Truncate: To allow the values in the fields to be shortened if a value exceeds the predefined size limit of a field, select this checkbox.
-
File Format: Select CSV.
- Click Add Mapping.
The Add Mapping window appears.
- Specify values in the following fields:
-
Columns: Select the SmartReach field that represents a field in the file.
Example
Suppose that your file contains three records presented as follows.
Delete
To add a mapping for the first name field, in the Columns field, select First Name. Similarly, to add a mapping for the last name field, in the Columns field, select Last Name. -
Position: Enter the position of the field in the file.
Example
Suppose that your file contains three records presented as follows:
In the Position field:- For the Account mapping, enter 1.
- For the First Name mapping, enter 2.
- For the Last Name mapping, enter 3.
- Transformations: Select the data type of the field.
- Description (Optional): Enter a description of the field.
- Default Value: If the field is always required in the business workflow, specify the property (for example, Enabled or Disabled) or value that must be displayed in that field if it does not contain a property or value in the file.
-
- Click OK.
- Repeat Steps 7 through 9 for each field in your file.
- Click Save Filter.
The input filter is created. You can now import contacts from your file into Contact Manager.
- Click Save Filter.
Procedure
To import contacts from your file into Contact Manager:
- On LVP, on the Configure tab, click Contacts > Contacts.
The Contacts window (Contact Manager) appears. - Click Import.
The Import Contact window appears. - Specify values in the following fields:
- File: Select your file by clicking Choose File.
-
File Format: Select the input filter you created.
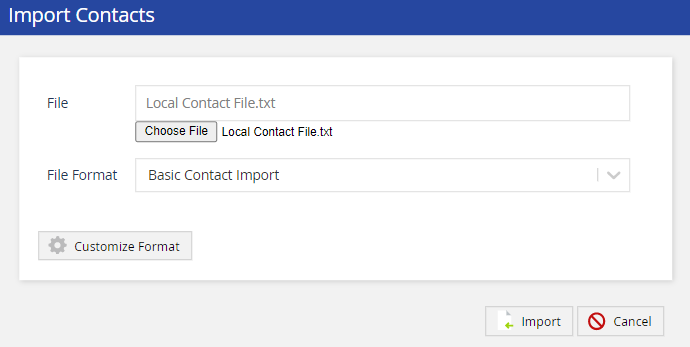
- Click Import.
A message stating that the import task is running appears. - After the message disappears, refresh the window.
All the contacts in your file are imported to LVP, and they appear on the Contacts tab of Contact Manager.