When you import data (for example, contact information, account details, or transaction records) into the LiveVox Portal (LVP), you must create input filters that can read the data submitted in your files into a format that can be stored in the LiveVox databases. An input filter processes and imports the data from a file into LVP through field mapping and data transformation.
Mapping is the process of creating a link between the source data (file) and the target data (LVP).
U17
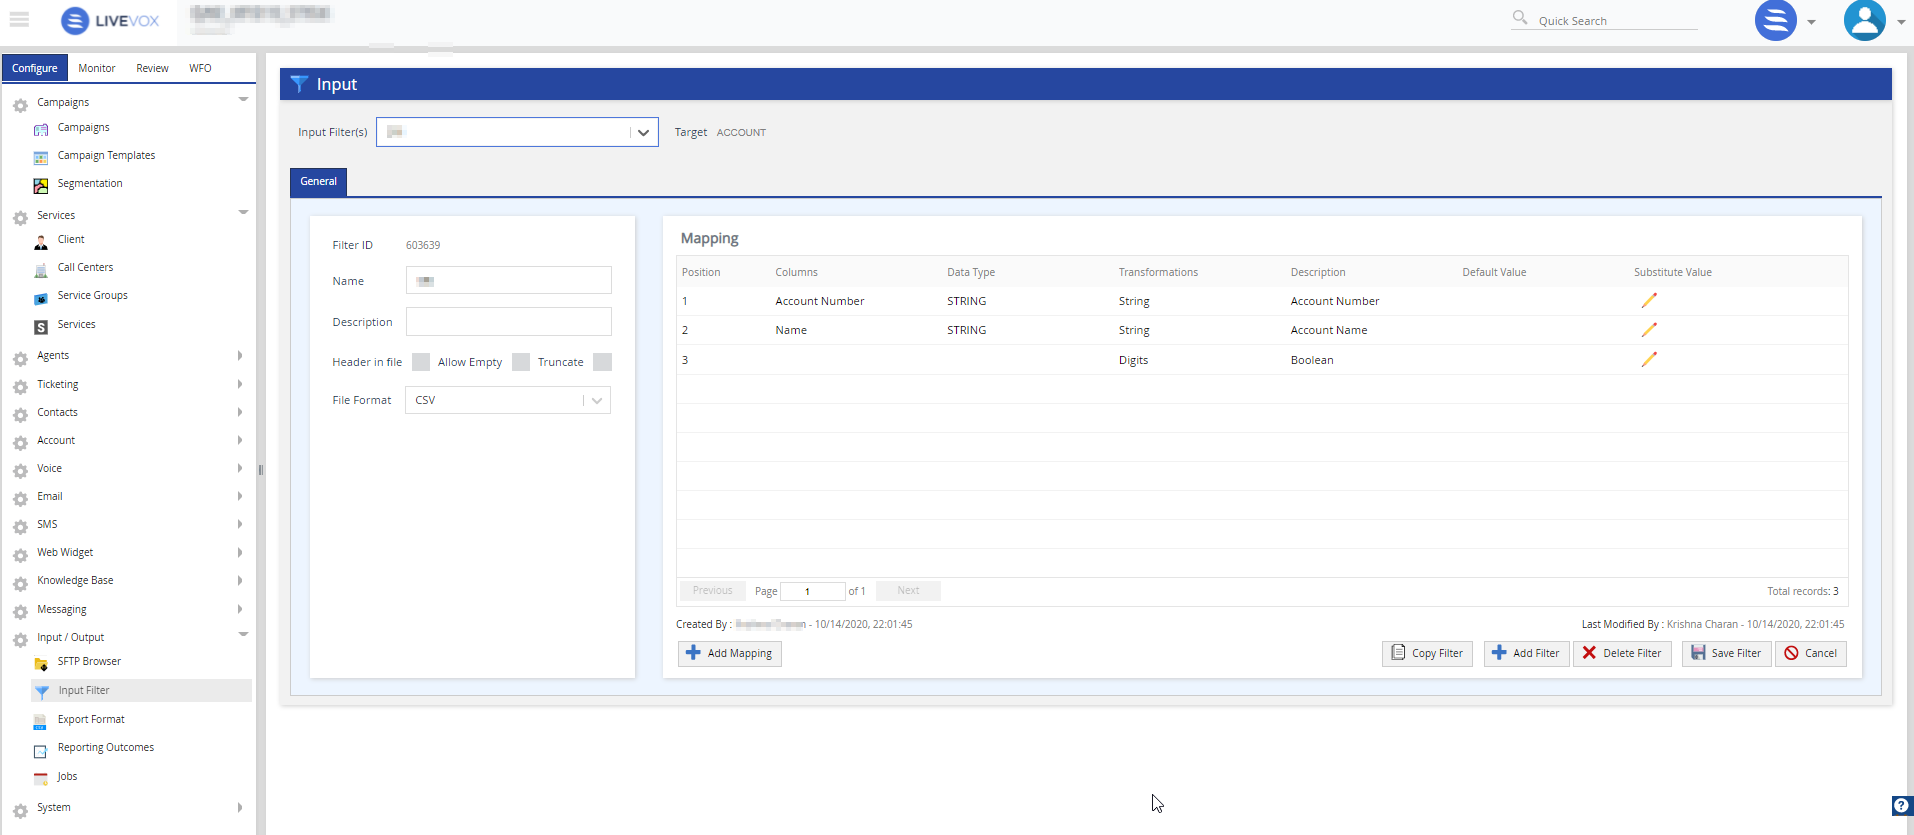
Accessing Input Filter Settings
To access the input filter settings, on the Configure tab of the LiveVox Portal, click Input / Output > Input Filter.
Creating an Input Filter
To create an input filter:
- Log in to the LiveVox Portal (LVP).
- On the Configure tab, click Input / Output > Input.
The Input window displaying the General tab appears.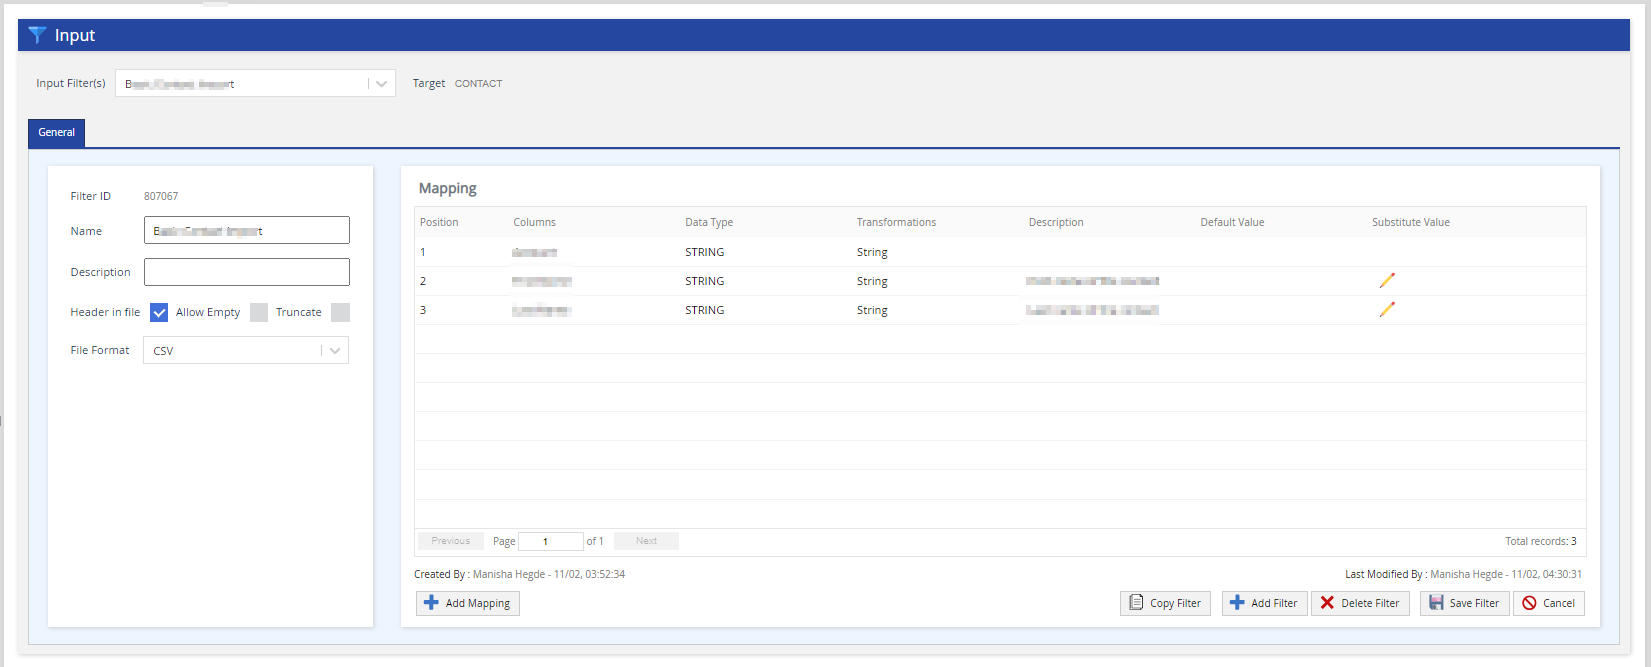
- Click Add Filter.
The Add Filter window appears.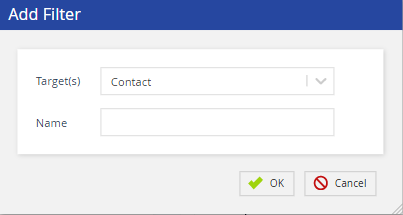
- Specify values in the fields, as described in the following table.
Field Description Target(s) Select one of the following options:
- Transaction: Used for importing campaigns to LVP.
- Contact: Used for importing contacts to LVP.
- Account: Used for importing accounts to LVP.
- Ticketing: Used for importing tickets to LVP.
- SMS DNC: Used for importing the SMS Do-Not-Call list of phone numbers to LVP.
- Phone DNC: Used for importing the Do-Not-Call list of phone numbers to LVP.
- Email DNC: Used for importing the email Do-Not-Call list of email addresses to LiveVox.
Name Specify a name to identify the filter throughout LVP. - Click OK.
The tabs and fields for the new filter appear in the Input window.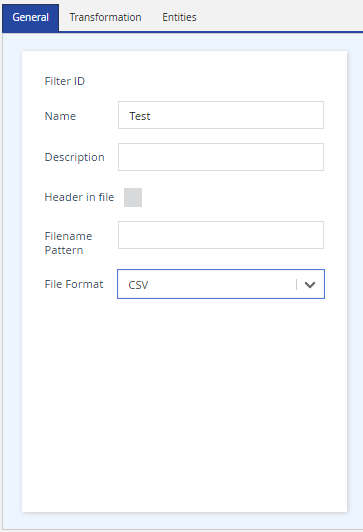
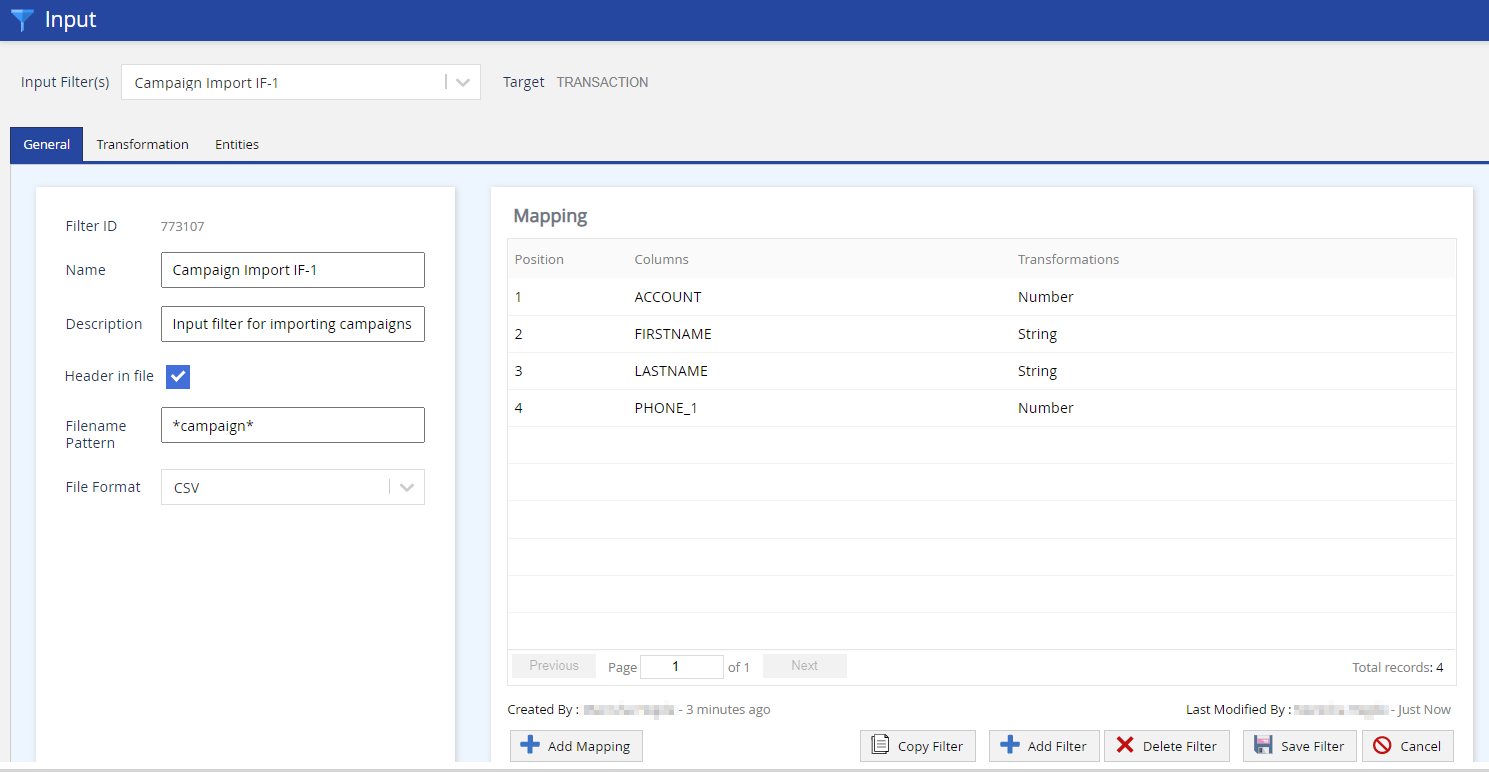
- On the General tab, specify values in the fields as described in the following table. For detailed descriptions and examples, see Input Filter Fields in the Admin Guide.
Field Descriptions Filter ID This field appears blank when you create the input filter. The value appears once the filter is created. Name Displays the name of the filter. Description Enter a description of the filter. Header in file If the input file you want to import contains a heading, select this checkbox to ensure that the first line in the file is ignored when the file is imported to LVP. Filename Pattern This field appears only if the value in the Target field is Transaction. Enter the pattern of the name of the file you want to import. Ensure that the pattern is unique and that the name of the file contains the same pattern.
- An asterisk ( * ) in the pattern indicates a wildcard at the beginning or end of the pattern. For example, the pattern *account indicates that the file name ends with account.
- A question mark ( ? ) in the pattern indicates a character placeholder, regardless of the type of character and its casing (that is, lowercase or uppercase). For example, the pattern ????_* indicates that the file name begins with four characters that are followed by an underscore ( _ ).
- A pipe ( | ) in the pattern indicates an OR logical separator. For example, the pattern maximum*|minimum*|*NYCindicates one of the following:
- The file name begins with maximum.
- The file name begins with minimum.
- The file name ends with NYC.
File Format Select one of the following options:
- CSV: Used for importing a comma-separated values (CSV) file.
-
Custom: Used for importing a customized file. When you select this option, the following fields appear:
- Field Delimiter: If a character is used to separate the fields in the file, enter that character. For example, if the fields in the file are separated by a comma, enter the following character:
- Row Delimiter: If a character is used to separate the records in the file, enter that character. For example, if the records in the file are separated by a line break, enter the following character: \n
- Quote: If each field in the file is enclosed in quotation marks, enter the following characters: """"
- Fixed Row Length: If field and row delimiters are not used in the file, enter the fixed length of characters for the record.
- Fixed Fields with Row Delimiters: Used for importing a CSV file that uses a row delimiter and does not use a field delimiter. If you select this option, the Length column appears in the Mapping section to enable you to enter the total character length for each field.
- Pipe: Used for importing a .pipe file. This option appears if the value in the Target field is Contact, Account, or Ticketing.
- TAB Delimited: Used for importing a tab-separated values (TSV) file.
Allow Empty This checkbox appears only if the value in the Target field is Contact, Account, or Ticketing.
If you want the null values in the file to also be imported to LVP, select this checkbox.
Truncate This checkbox appears only if the value in the Target field is Contact, Account, or Ticketing.
If you want the values in the fields in the file to be shortened if the length of the values exceeds the predefined size limit of those fields, select this checkbox.
- Click Add Mapping and complete the mapping of the filter. For instructions, see the next section Adding a Mapping.
- After adding the mapping, click Save Filter.
- Optional: To have a specific field value in the file replaced with a different value during the import, see the Substituting a Value section.
 Delete
Adding a Mapping
- Click Add Mapping.
The Add Mapping window appears.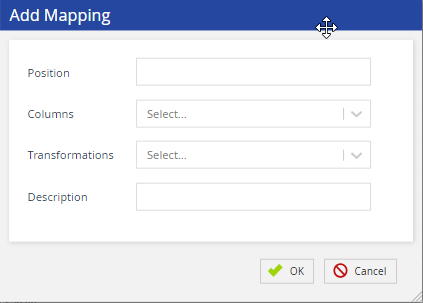
- Specify values in the fields, as described in the following table. For detailed descriptions and examples, see Input Filter Fields in the Admin Guide.
Field Description Position Enter the position of the field selected in the Columns field.
If the value in the File Format field is Fixed Fields with Row Delimiters, enter the position of the first character of any field value.Columns Select the LVP field that represents a field in the input file. Total Length This field appears if the value in the File Format field is Fixed Fields with Row Delimiters.
Enter the fixed length of the characters in the field selected in the Columns field.
Transformations Select the data type of the field selected in the Columns field. - The options that appear in this field depend on the value in the Columns field.
- The default data type for a given field is specified in the Fields window.
- When the Target of your input filter is Transaction, Columns, such as Extra_16, Custom_16, Custom_8 do not support the following characters in the text:
- Apostrophe ( ' )
- Less than (<)
- Greater than (>)
- Ampersand (&)
- Quotation marks (")
Description This field is optional.
Enter the description of the field selected in the Columns field.
Default Value This field appears only if you select the target as Account or Ticketing.
If the field selected in the Columns field is always required in the business workflow, specify the property (for example, Enabled or Disabled) or the value that must be displayed in that field if it does not contain a property or value in the file.
- Click OK.
- For each field in the file, repeat Steps 1 through 3.
The mapping appears in the Mapping section.
Substituting a Value
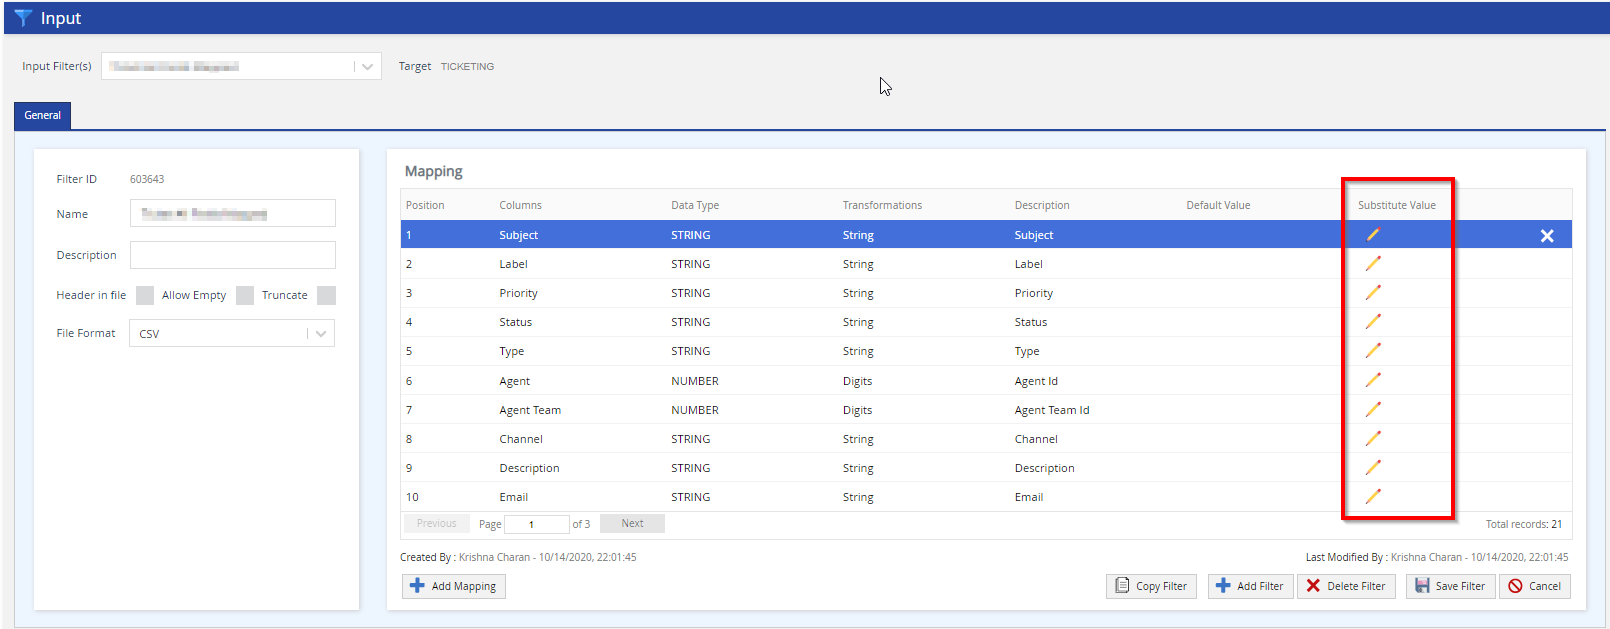
You can replace a specific value in a field in the input file with a different value when the file is imported to LVP. The Substitute Value column that appears in the Mapping section on the General tab in the Input window facilitates this action. This column appears only if the value in the Target field of the input filter is Account, Contact, or Ticketing.
To substitute a field value in the file:
- Access the input filter.
- On the General tab, in the Mapping section, in the Substitute Value cell of the row displaying the field, click the pencil icon.
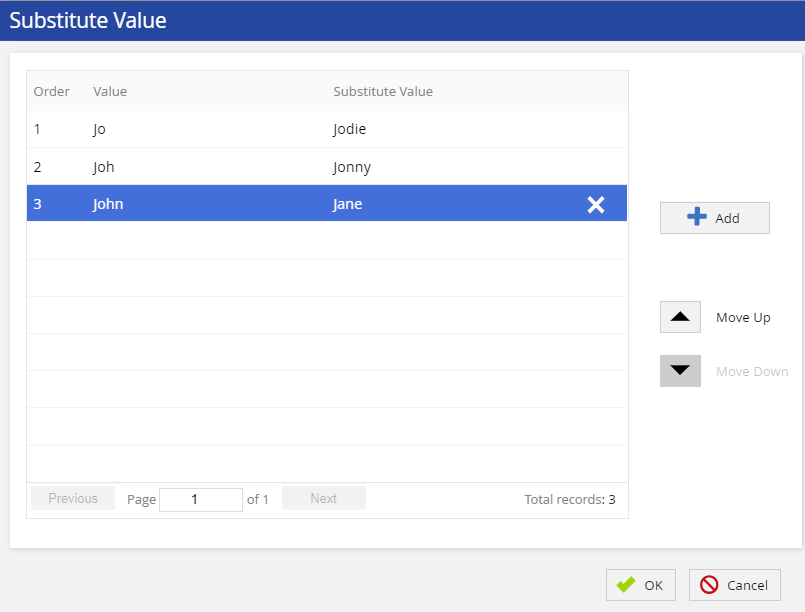
 The Substitute Value window appears.
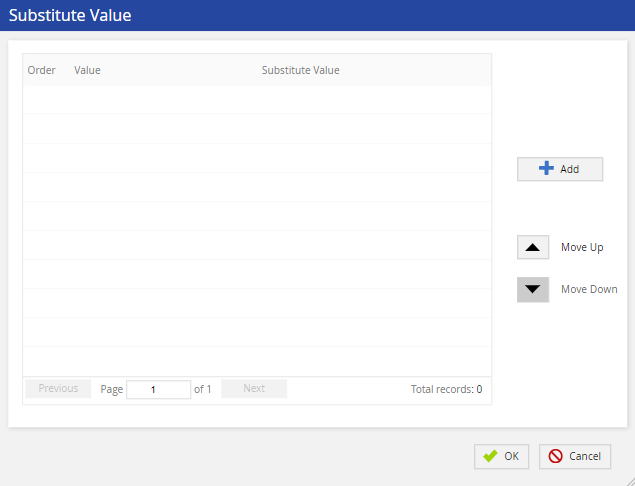
- Click Add.
The Substitute Value pop-up window appears. - Enter values in the following fields. Numbers appear in the Order column as you enter values in the fields:
- Value: The field value that you want to be replaced.
- Substitute Value: The new value (substitute) for the field.
- Click OK.
- In the Substitute Value window, you can:
- Add a maximum of 50 substitute values (for each mapping).
- Modify a substitute value by double-clicking the row displaying the value.
- Delete a substitute value by hovering over the row displaying the value and then clicking the close icon
 .
.
- Optional: To define the priority of substitution, select the row displaying the value, and then click Move Up or Move Down.
- You might want to define the substitution priority if the values you have added for substitution are similar.
- Click OK.
- In the Mapping section, A green check mark appears next to the pencil icon in the Substitute Value cell of the row displaying the field whose value you substituted.
- Click Save Filter.
Your changes are saved in the input filter.
DeleteLV19
Accessing Input Filter Settings
To access the input filter settings, on the Configure tab of the LiveVox Portal, click Input / Output > Input.

Creating an Input Filter
To create an input filter:
- Log in to the LiveVox Portal (LVP).
- On the Configure tab, click Input / Output > Input.
The Input window displaying the General tab appears.
- Click Add Filter.
The Add Filter window appears.
- Specify values in the fields, as described in the following table.
Field Description Target(s) Select one of the following options:
- Transaction: Used for importing campaigns to LVP.
- Contact: Used for importing contacts to LVP.
- Account: Used for importing accounts to LVP.
- Ticketing: Used for importing tickets to LVP.
- SMS DNC: Used for importing the SMS Do-Not-Call list of phone numbers to LVP.
- Phone DNC: Used for importing the Do-Not-Call list of phone numbers to LVP.
- Email DNC: Used for importing the email Do-Not-Call list of email addresses to LiveVox.
Name Specify a name to identify the filter throughout LVP. - Click OK.
The tabs and fields for the new filter appear in the Input window.
- On the General tab, specify values in the fields as described in the following table. For detailed descriptions and examples, see Input Filter Fields in the Admin Guide.
Field Descriptions Filter ID This field appears blank when you create the input filter. The value appears once the filter is created. Name Displays the name of the filter. Description Enter a description of the filter. Header in file If the input file you want to import contains a heading, select this checkbox to ensure that the first line in the file is ignored when the file is imported to LVP. Filename Pattern This field appears only if the value in the Target field is Transaction. Enter the pattern of the name of the file you want to import. Ensure that the pattern is unique and that the name of the file contains the same pattern.
- An asterisk ( * ) in the pattern indicates a wildcard at the beginning or end of the pattern. For example, the pattern *account indicates that the file name ends with account.
- A question mark ( ? ) in the pattern indicates a character placeholder, regardless of the type of character and its casing (that is, lowercase or uppercase). For example, the pattern ????_* indicates that the file name begins with four characters that are followed by an underscore ( _ ).
- A pipe ( | ) in the pattern indicates an OR logical separator. For example, the pattern maximum*|minimum*|*NYCindicates one of the following:
- The file name begins with maximum.
- The file name begins with minimum.
- The file name ends with NYC.
File Format Select one of the following options:
- CSV: Used for importing a comma-separated values (CSV) file.
-
Custom: Used for importing a customized file. When you select this option, the following fields appear:
- Field Delimiter: If a character is used to separate the fields in the file, enter that character. For example, if the fields in the file are separated by a comma, enter the following character:
- Row Delimiter: If a character is used to separate the records in the file, enter that character. For example, if the records in the file are separated by a line break, enter the following character: \n
- Quote: If each field in the file is enclosed in quotation marks, enter the following characters: """"
- Fixed Row Length: If field and row delimiters are not used in the file, enter the fixed length of characters for the record.
- Fixed Fields with Row Delimiters: Used for importing a CSV file that uses a row delimiter and does not use a field delimiter. If you select this option, the Length column appears in the Mapping section to enable you to enter the total character length for each field.
- Pipe: Used for importing a .pipe file. This option appears if the value in the Target field is Contact, Account, or Ticketing.
- TAB Delimited: Used for importing a tab-separated values (TSV) file.
Allow Empty This checkbox appears only if the value in the Target field is Contact, Account, or Ticketing.
If you want the null values in the file to also be imported to LVP, select this checkbox.
Truncate This checkbox appears only if the value in the Target field is Contact, Account, or Ticketing.
If you want the values in the fields in the file to be shortened if the length of the values exceeds the predefined size limit of those fields, select this checkbox.
- Click Add Mapping and complete the mapping of the filter. For instructions, see the next section Adding a Mapping.
- After adding the mapping, click Save Filter.
- Optional: To have a specific field value in the file replaced with a different value during the import, see the Substituting a Value section.

Adding a Mapping
- Click Add Mapping.
The Add Mapping window appears.
- Specify values in the fields, as described in the following table. For detailed descriptions and examples, see Input Filter Fields in the Admin Guide.
Field Description Position Enter the position of the field selected in the Columns field.
If the value in the File Format field is Fixed Fields with Row Delimiters, enter the position of the first character of any field value.Columns Select the LVP field that represents a field in the input file. Total Length This field appears if the value in the File Format field is Fixed Fields with Row Delimiters.
Enter the fixed length of the characters in the field selected in the Columns field.
Transformations Select the data type of the field selected in the Columns field. - The options that appear in this field depend on the value in the Columns field.
- The default data type for a given field is specified in the Fields window.
- When the Target of your input filter is Transaction, Columns, such as Extra_16, Custom_16, Custom_8 do not support the following characters in the text:
- Apostrophe ( ' )
- Less than (<)
- Greater than (>)
- Ampersand (&)
- Quotation marks (")
Description This field is optional.
Enter the description of the field selected in the Columns field.
Default Value This field appears only if you select the target as Account or Ticketing.
If the field selected in the Columns field is always required in the business workflow, specify the property (for example, Enabled or Disabled) or the value that must be displayed in that field if it does not contain a property or value in the file.
- Click OK.
- For each field in the file, repeat Steps 1 through 3.
The mapping appears in the Mapping section.
Substituting a Value
You can replace a specific value in a field in the input file with a different value when the file is imported to LVP. The Substitute Value column that appears in the Mapping section on the General tab in the Input window facilitates this action. This column appears only if the value in the Target field of the input filter is Account, Contact, or Ticketing.
To substitute a field value in the file:
- Access the input filter.
- On the General tab, in the Mapping section, in the Substitute Value cell of the row displaying the field, click the pencil icon.
 The Substitute Value window appears.
- Click Add.
The Substitute Value pop-up window appears. - Enter values in the following fields. Numbers appear in the Order column as you enter values in the fields:
- Value: The field value that you want to be replaced.
- Substitute Value: The new value (substitute) for the field.
- Click OK.
- In the Substitute Value window, you can:
- Add a maximum of 50 substitute values (for each mapping).
- Modify a substitute value by double-clicking the row displaying the value.
- Delete a substitute value by hovering over the row displaying the value and then clicking the close icon
 .
.
- Optional: To define the priority of substitution, select the row displaying the value, and then click Move Up or Move Down.
- You might want to define the substitution priority if the values you have added for substitution are similar.

- Click OK.
- In the Mapping section, A green check mark appears next to the pencil icon in the Substitute Value cell of the row displaying the field whose value you substituted.
- Click Save Filter.
Your changes are saved in the input filter.
DeleteFall23
Accessing Input Filter Settings
To access the input filter settings, on the Configure tab of the LiveVox Portal, click Input / Output > Input Filter.

Creating an Input Filter
To create an input filter:
- Log in to the LiveVox Portal (LVP).
- On the Configure tab, click Input / Output > Input.
The Input window displaying the General tab appears.
- Click Add Filter.
The Add Filter window appears.
- Specify values in the fields, as described in the following table.
Field Description Target(s) Select one of the following options:
- Transaction: Used for importing campaigns to LVP.
- Contact: Used for importing contacts to LVP.
- Account: Used for importing accounts to LVP.
- Ticketing: Used for importing tickets to LVP.
- SMS DNC: Used for importing the SMS Do-Not-Call list of phone numbers to LVP.
- Phone DNC: Used for importing the Do-Not-Call list of phone numbers to LVP.
- Email DNC: Used for importing the email Do-Not-Call list of email addresses to LiveVox.
Name Specify a name to identify the filter throughout LVP. - Click OK.
The tabs and fields for the new filter appear in the Input window.
- On the General tab, specify values in the fields as described in the following table. For detailed descriptions and examples, see Input Filter Fields in the Admin Guide.
Field Descriptions Filter ID This field appears blank when you create the input filter. The value appears once the filter is created. Name Displays the name of the filter. Description Enter a description of the filter. Header in file If the input file you want to import contains a heading, select this checkbox to ensure that the first line in the file is ignored when the file is imported to LVP. Filename Pattern This field appears only if the value in the Target field is Transaction. Enter the pattern of the name of the file you want to import. Ensure that the pattern is unique and that the name of the file contains the same pattern.
- An asterisk ( * ) in the pattern indicates a wildcard at the beginning or end of the pattern. For example, the pattern *account indicates that the file name ends with account.
- A question mark ( ? ) in the pattern indicates a character placeholder, regardless of the type of character and its casing (that is, lowercase or uppercase). For example, the pattern ????_* indicates that the file name begins with four characters that are followed by an underscore ( _ ).
- A pipe ( | ) in the pattern indicates an OR logical separator. For example, the pattern maximum*|minimum*|*NYCindicates one of the following:
- The file name begins with maximum.
- The file name begins with minimum.
- The file name ends with NYC.
File Format Select one of the following options:
- CSV: Used for importing a comma-separated values (CSV) file.
-
Custom: Used for importing a customized file. When you select this option, the following fields appear:
- Field Delimiter: If a character is used to separate the fields in the file, enter that character. For example, if the fields in the file are separated by a comma, enter the following character:
- Row Delimiter: If a character is used to separate the records in the file, enter that character. For example, if the records in the file are separated by a line break, enter the following character: \n
- Quote: If each field in the file is enclosed in quotation marks, enter the following characters: """"
- Fixed Row Length: If field and row delimiters are not used in the file, enter the fixed length of characters for the record.
- Fixed Fields with Row Delimiters: Used for importing a CSV file that uses a row delimiter and does not use a field delimiter. If you select this option, the Length column appears in the Mapping section to enable you to enter the total character length for each field.
- Pipe: Used for importing a .pipe file. This option appears if the value in the Target field is Contact, Account, or Ticketing.
- TAB Delimited: Used for importing a tab-separated values (TSV) file.
Allow Empty This checkbox appears only if the value in the Target field is Contact, Account, or Ticketing.
If you want the null values in the file to also be imported to LVP, select this checkbox.
Truncate This checkbox appears only if the value in the Target field is Contact, Account, or Ticketing.
If you want the values in the fields in the file to be shortened if the length of the values exceeds the predefined size limit of those fields, select this checkbox.
- Click Add Mapping and complete the mapping of the filter. For instructions, see the next section Adding a Mapping.
- After adding the mapping, click Save Filter.
- Optional: To have a specific field value in the file replaced with a different value during the import, see the Substituting a Value section.
- The input filter is created, and a value appears in the Filter ID field.

Adding a Mapping
- Click Add Mapping.
The Add Mapping window appears.
- Specify values in the fields, as described in the following table. For detailed descriptions and examples, see Input Filter Fields in the Admin Guide.
Field Description Position Enter the position of the field selected in the Columns field.
If the value in the File Format field is Fixed Fields with Row Delimiters, enter the position of the first character of any field value.Columns Select the LVP field that represents a field in the input file. Total Length This field appears if the value in the File Format field is Fixed Fields with Row Delimiters.
Enter the fixed length of the characters in the field selected in the Columns field.
Transformations Select the data type of the field selected in the Columns field. - The options that appear in this field depend on the value in the Columns field.
- The default data type for a given field is specified in the Fields window.
- When the Target of your input filter is Transaction, Columns, such as Extra_16, Custom_16, Custom_8 do not support the following characters in the text:
- Apostrophe ( ' )
- Less than (<)
- Greater than (>)
- Ampersand (&)
- Quotation marks (")
Description This field is optional.
Enter the description of the field selected in the Columns field.
Default Value This field appears only if you select the target as Account or Ticketing.
If the field selected in the Columns field is always required in the business workflow, specify the property (for example, Enabled or Disabled) or the value that must be displayed in that field if it does not contain a property or value in the file.
- Click OK.
- For each field in the file, repeat Steps 1 through 3.
The mapping appears in the Mapping section.
Substituting a Value
You can replace a specific value in a field in the input file with a different value when the file is imported to LVP. The Substitute Value column that appears in the Mapping section on the General tab in the Input window facilitates this action. This column appears only if the value in the Target field of the input filter is Account, Contact, or Ticketing.
To substitute a field value in the file:
- Access the input filter.
- On the General tab, in the Mapping section, in the Substitute Value cell of the row displaying the field, click the pencil icon.
 The Substitute Value window appears.
- Click Add.
The Substitute Value pop-up window appears. - Enter values in the following fields. Numbers appear in the Order column as you enter values in the fields:
- Value: The field value that you want to be replaced.
- Substitute Value: The new value (substitute) for the field.
- Click OK.
- In the Substitute Value window, you can:
- Add a maximum of 50 substitute values (for each mapping).
- Modify a substitute value by double-clicking the row displaying the value.
- Delete a substitute value by hovering over the row displaying the value and then clicking the close icon
 .
.
- Optional: To define the priority of substitution, select the row displaying the value, and then click Move Up or Move Down.
- You might want to define the substitution priority if the values you have added for substitution are similar.

- Click OK.
- In the Mapping section, A green check mark appears next to the pencil icon in the Substitute Value cell of the row displaying the field whose value you substituted.
- Click Save Filter.
Your changes are saved in the input filter.
DeleteFall24
Accessing Input Filter Settings
To access the input filter settings, on the Config tab of the SmartReach portal, click Input / Output > Input.

Creating an Input Filter
To create an input filter:
- Log in to the SmartReach portal.
- On the Config tab, click Input / Output > Input.
The Input window displaying the General tab appears.
- Click Add Filter.
The Add Filter window appears.
- Specify values in the fields, as described in the following table.
Field Description Target(s) Select one of the following options:
- Transaction: Used for importing campaigns to SmartReach.
- Contact: Used for importing contacts to SmartReach.
- Account: Used for importing accounts to SmartReach.
- Ticketing: Used for importing tickets to SmartReach.
- SMS DNC: Used for importing the SMS Do-Not-Call list of phone numbers to SmartReach.
- Phone DNC: Used for importing the Do-Not-Call list of phone numbers to SmartReach.
- Email DNC: Used for importing the email Do-Not-Call list of email addresses to SmartReach.
Name Specify a name to identify the filter throughout SmartReach. - Click OK.
The tabs and fields for the new filter appear in the Input window.
- On the General tab, specify values in the fields as described in the following table. For detailed descriptions and examples, see Input Filter Fields in the Admin Guide.
Field Descriptions Filter ID This field appears blank when you create the input filter. The value appears once the filter is created. Name Displays the name of the filter. Description Enter a description of the filter. Header in file If the input file you want to import contains a heading, select this checkbox to ensure that the first line in the file is ignored when the file is imported to SmartReach. Filename Pattern This field appears only if the value in the Target field is Transaction. Enter the pattern of the name of the file you want to import. Ensure that the pattern is unique and that the name of the file contains the same pattern.
- An asterisk ( * ) in the pattern indicates a wildcard at the beginning or end of the pattern. For example, the pattern *account indicates that the file name ends with account.
- A question mark ( ? ) in the pattern indicates a character placeholder, regardless of the type of character and its casing (that is, lowercase or uppercase). For example, the pattern ????_* indicates that the file name begins with four characters that are followed by an underscore ( _ ).
- A pipe ( | ) in the pattern indicates an OR logical separator. For example, the pattern maximum*|minimum*|*NYCindicates one of the following:
- The file name begins with maximum.
- The file name begins with minimum.
- The file name ends with NYC.
File Format Select one of the following options:
- CSV: Used for importing a comma-separated values (CSV) file.
-
Custom: Used for importing a customized file. When you select this option, the following fields appear:
- Field Delimiter: If a character is used to separate the fields in the file, enter that character. For example, if the fields in the file are separated by a comma, enter the following character:
- Row Delimiter: If a character is used to separate the records in the file, enter that character. For example, if the records in the file are separated by a line break, enter the following character: \n
- Quote: If each field in the file is enclosed in quotation marks, enter the following characters: """"
- Fixed Row Length: If field and row delimiters are not used in the file, enter the fixed length of characters for the record.
- Fixed Fields with Row Delimiters: Used for importing a CSV file that uses a row delimiter and does not use a field delimiter. If you select this option, the Length column appears in the Mapping section to enable you to enter the total character length for each field.
- Pipe: Used for importing a .pipe file. This option appears if the value in the Target field is Contact, Account, or Ticketing.
- TAB Delimited: Used for importing a tab-separated values (TSV) file.
Allow Empty This checkbox appears only if the value in the Target field is Contact, Account, or Ticketing.
If you want the null values in the file to also be imported to SmartReach, select this checkbox.
Truncate This checkbox appears only if the value in the Target field is Contact, Account, or Ticketing.
If you want the values in the fields in the file to be shortened if the length of the values exceeds the predefined size limit of those fields, select this checkbox.
- Click Add Mapping and complete the mapping of the filter. For instructions, see the next section Adding a Mapping.
- After adding the mapping, click Save Filter.
- Optional: To have a specific field value in the file replaced with a different value during the import, see the Substituting a Value section.
- The input filter is created, and a value appears in the Filter ID field.

Adding a Mapping
- Click Add Mapping.
The Add Mapping window appears.
- Specify values in the fields, as described in the following table. For detailed descriptions and examples, see Input Filter Fields in the Admin Guide.
Field Description Position Enter the position of the field selected in the Columns field.
If the value in the File Format field is Fixed Fields with Row Delimiters, enter the position of the first character of any field value.Columns Select the SmartReach field that represents a field in the input file. Total Length This field appears if the value in the File Format field is Fixed Fields with Row Delimiters.
Enter the fixed length of the characters in the field selected in the Columns field.
Transformations Select the data type of the field selected in the Columns field. - The options that appear in this field depend on the value in the Columns field.
- The default data type for a given field is specified in the Fields window.
- When the Target of your input filter is Transaction, Columns, such as Extra_16, Custom_16, Custom_8 do not support the following characters in the text:
- Apostrophe ( ' )
- Less than (<)
- Greater than (>)
- Ampersand (&)
- Quotation marks (")
Description This field is optional.
Enter the description of the field selected in the Columns field.
Default Value This field appears only if you select the target as Account or Ticketing.
If the field selected in the Columns field is always required in the business workflow, specify the property (for example, Enabled or Disabled) or the value that must be displayed in that field if it does not contain a property or value in the file.
- Click OK.
- For each field in the file, repeat Steps 1 through 3.
The mapping appears in the Mapping section.
Substituting a Value
You can replace a specific value in a field in the input file with a different value when the file is imported to SmartReach. The Substitute Value column that appears in the Mapping section on the General tab in the Input window facilitates this action. This column appears only if the value in the Target field of the input filter is Account, Contact, or Ticketing.
To substitute a field value in the file:
- Access the input filter.
- On the General tab, in the Mapping section, in the Substitute Value cell of the row displaying the field, click the pencil icon.

The Substitute Value window appears.
- Click Add.
The Substitute Value pop-up window appears. - Enter values in the following fields. Numbers appear in the Order column as you enter values in the fields:
- Value: The field value that you want to be replaced.
- Substitute Value: The new value (substitute) for the field.
- Click OK.
- In the Substitute Value window, you can:
- Add a maximum of 50 substitute values (for each mapping).
- Modify a substitute value by double-clicking the row displaying the value.
- Delete a substitute value by hovering over the row displaying the value and then clicking the close icon
 .
.
- Optional: To define the priority of substitution, select the row displaying the value, and then click Move Up or Move Down.
- You might want to define the substitution priority if the values you have added for substitution are similar.

- Click OK.
- In the Mapping section, A green check mark appears next to the pencil icon in the Substitute Value cell of the row displaying the field whose value you substituted.
- Click Save Filter.
Your changes are saved in the input filter.
Delete